IT Solutions, Security, and Support Services. 703-297-8227

100% USA Citizen Owned and Operated

Proud to Hire Veterans

Best Of Loudoun 2023-Winner Badge.

Best IT Services/Computer Repair

Outlook 2003 Email Settings

How to Configure Outlook to use Ashley Cyber eMail Servers

If at any time you have trouble and would like assistance, please feel free to contact the Ashley Cyber Computer and Network Support Department at (703) 297-8227.

I. Ashley Cyber Mail Server Settings:

User Information

  • Your Name: This displays in the “from” field when you send an email.
  • Email Address: username@domain.xxx

Login Information

  • Login Name: Same as email address, username@domain.xxx
  • Password: Provided by your Administrator or the password you just set in WebMail

Server Information

  • Incoming Mail Server: sm01.mail.ashleycyber.com
  • Outgoing Mail Server: sm01.mail.ashleycyber.com

II. Configuring Outlook to use Ashley Cyber Mail Servers:

  1. Open Microsoft Outlook
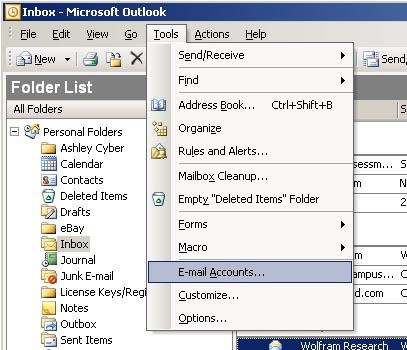
  2. Open the Email Accounts Wizard by clicking on Tools and selecting “Email Acounts…Outlook 2003 Email Settings - Email AccountsOutlook 2003 Email Settings - Add New
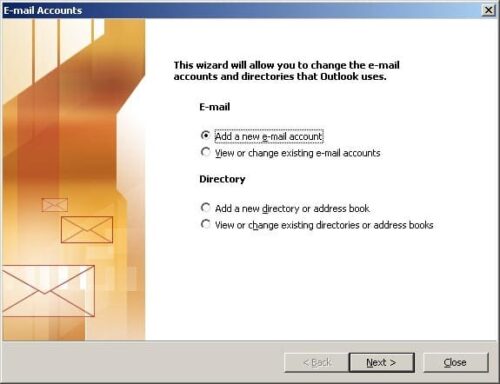
  3. Make sure that “Add a new e-mail account” is selected.
  4. Click Next to continue.Outlook 2003 Email Settings - Server Type
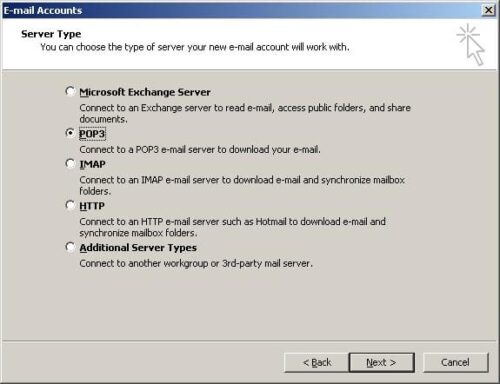
  5. Make sure that “POP3” is selected.
  6. Click Next to continue.
  7. Please enter the following information:
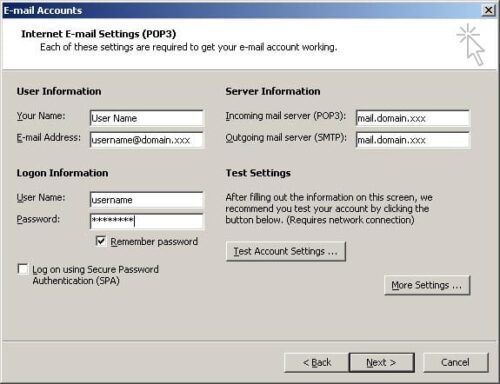
    User Information
    Your Name: Please input your name as you want it to be displayed on sent mail.
    Email Address: username@domain.xxx


    Logon Information

    User Name: Same as your email address, please verify that your username includes@domain.xxx
    Password: Please input your new password provided by your Administrator. Make sure the“Remember Password” box is selected.

    Server Information

    Incoming Mail Server: mail.domain.xxx
    Outgoing Mail Server: mail.domain.xxx

  8. Click More Settings to continue.Outlook 2003 Email Settings - General Settings
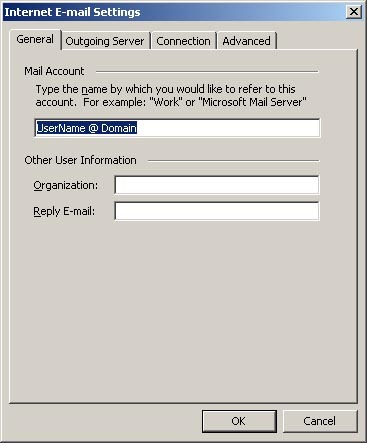
  9. Change the default name from mail.domain.xxx to something easier to read, such as “Work Email,” or “UserName @ Domain.” This may make the account easier to find should you need to make changes later.
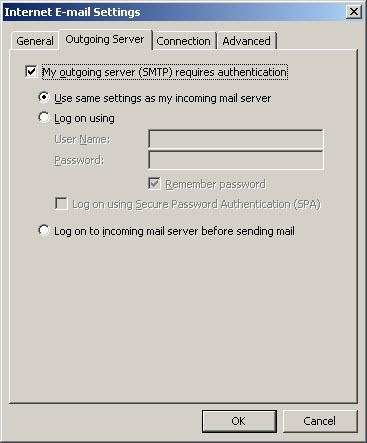
  10. Select the “Outgoing Server” tab to continue.Outlook 2003 Email Settings - Outgoing Server
  11. Verify that the “My outgoing server (SMTP) requires authentication” box is selected and that the “Use same settings as my incoming mail server” button is selected.
  12. Click OK to continue.
  13. Click Next to continue.
  14. Click Finish to close the “Email Accounts” dialog window.

Testimonials

At my dental practice, we are “paperless”, the computer system holds digital x-rays, imaging, treatment planning, and clinical notes as well as account information. If ever there is a problem with the computer system it makes it difficult to do our jobs. Therefore, I rely heavily on the knowledge, technical support and customer service of Ashley Cyber. I am most impressed by their efficiency in returning phone calls and even coming to the office the very same day (often times within the hour) to address any issues that come up. Customer service is really important and I have been very pleased with Ashley Cyber!! They designed my webpage, as well, and we have received many, many compliments on the layout.
Dr. Kokel, DDS
At my dental practice, we are “paperless”, the computer system holds digital x-rays, imaging, treatment planning, and clinical notes as well as account information. If ever there is a problem with the computer system it makes it difficult to do our jobs. Therefore, I rely heavily on the knowledge, technical support and customer service of Ashley Cyber. I am most impressed by their efficiency in returning phone calls and even coming to the office the very same day (often times within the hour) to address any issues that come up. Customer service is really important and I have been very pleased with Ashley Cyber!!They designed my webpage, as well, and we have received many, many compliments on the layout.
Dr. Kokel, DDS

Featured Solutions

Office 365 Plus Logo

Office 365 Plus

Secure Hosted Exchange Logo

Hosted Exchange